

A Million Little Processes: Porting a Server-based AWS Infrastructure to a Containerized, Serverless Architecture utilizing ECS & Fargate


Like most stories, this one is at least a little bit about money.
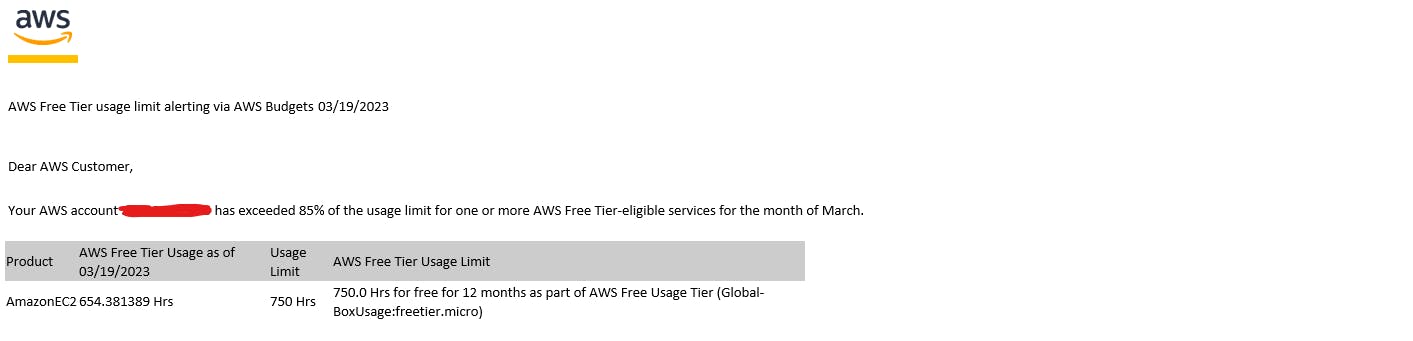
After I built my last project (as discussed here), I thought I could let that live on the internet for a while and coast off the free EC2 credits AWS allots to any account in the free tier. If you don't think about it, 750 hours sounds like a lot of time. If you think about it even a little bit, you realize that 750 hours is a little over a month (31.25 days to be exact).
That infrastructure was always intended to be transitory, a bus stop at Web Server Junction on my path to the Far Gate at Container City, the economic realities of AWS usage rates simply accelerated the timeline (and served as a good source of motivation).
The aims for this project were as follows:
Maintain the existing functionality of the application while migrating to a new containerized architecture
Utilize Docker to build the container image
Host the container image in an Elastic Container Registry (ECR)
Service the containers using Amazon Elastic Container Service (ECS) that are spun up via AWS Fargate
Migrate on-board compute power to serverless services to compensate for the reduced size of a container image when at all possible
Automate deployment of infrastructure via Terraform and Github Actions
With these goals in mind, this is what I ended up with (Github repo here):
Containerizing the Flask App
There were a few important considerations related to porting our Flask app designed to reside on a web server to one that was designed to operate within a container. In addition to having to refactor our process of creating the host for our app, the way it was deployed needed to change as well
Creating the container
While my web server was created using Amazon Linux 2, a variation of Red Hat Enterprise Linux, I opted for the significantly more lightweight Alpine distro for the containerized version of the app. A popular choice when image size is a priority, Alpine is significantly leaner than Amazon Linux or many other popular Linux distributions, allowing for smaller container images, which is good both for general performance, as well as security.
This lean approach to crafting a distribution does not come without downsides, however. In service of its approach to minimalism, as opposed to commonly used package managers such as Debian's APT or Red Hat's Yum, Alpine Linux uses it's proprietary package manager to install and update software, called APK (Alpine Package Keeper). In addition, certain pieces of software that users will take for granted as being pre-installed are not present on a base install of Alpine Linux. Most salient to us, Python is not present in the base install and needed to be manually loaded, which provided a unique wrinkle on the project that any of the more common Linux distros would not have provided.
This also had several unforeseen side effects. Since Python is not installed by default, the distro is not properly set up to handle Python data streams. Most notably in my case, the global variable PYTHONUNBUFFERED was not set. When set equal to 1 (as it typically is by default), the stderr data stream from Python will be sent to the terminal as the error occurs, as opposed to after the Python process terminates. This is important while working with Flask because if you start the Flask app in the path of troubleshooting and attempt to access the app and it does not open successfully, ifPYTHONUNBUFFERED is not set, you will not see the stderr data stream until the application terminates, and if it terminates with an error, you will not be able to view the stream at all.
Deploying the Application
In our previous server-based architecture, the application was deployed with mod_wsgi as our WSGI server, with the on-board Apache implementation serving as the reverse proxy that would redirect incoming web traffic to the WSGI server for servicing by the running Flask app.
When transitioning to a serverless architecture, the biggest change is that the reverse proxy does not have to be hosted on board the container, instead being hosted by whatever service will route traffic to the individual worker containers. As mod_wsgi is only designed to be used with Apache, I opted to switch the WSGI server to Gunicorn instead. In addition to not being reliant on Apache, Gunicorn also has several features that allow the WSGI server to efficiently handle simultaneous connections.
With all of these considerations and some testing, we ended up with a Dockerfile resembling the following:
FROM alpine
ENV PYTHONUNBUFFERED=1
COPY ./FlaskApp/ ./app
RUN apk add --update --no-cache python3 \
    && ln -sf python3 /usr/bin/python \
    && python3 -m ensurepip \
    && pip3 install --no-cache --upgrade pip setuptools \
    && pip3 install requests flask gunicorn
WORKDIR /app
CMD [ "gunicorn", "-b", "0.0.0.0:5000", "wsgi:app" ]
When fully built into a container image, this docker file deploys our Flask app, installs all the dependencies needed to run it, then allows it to be accessed via port 5000. With this first step of this project out of the way, we were ready to begin building our infrastructure
Building the Underlying Infrastructure
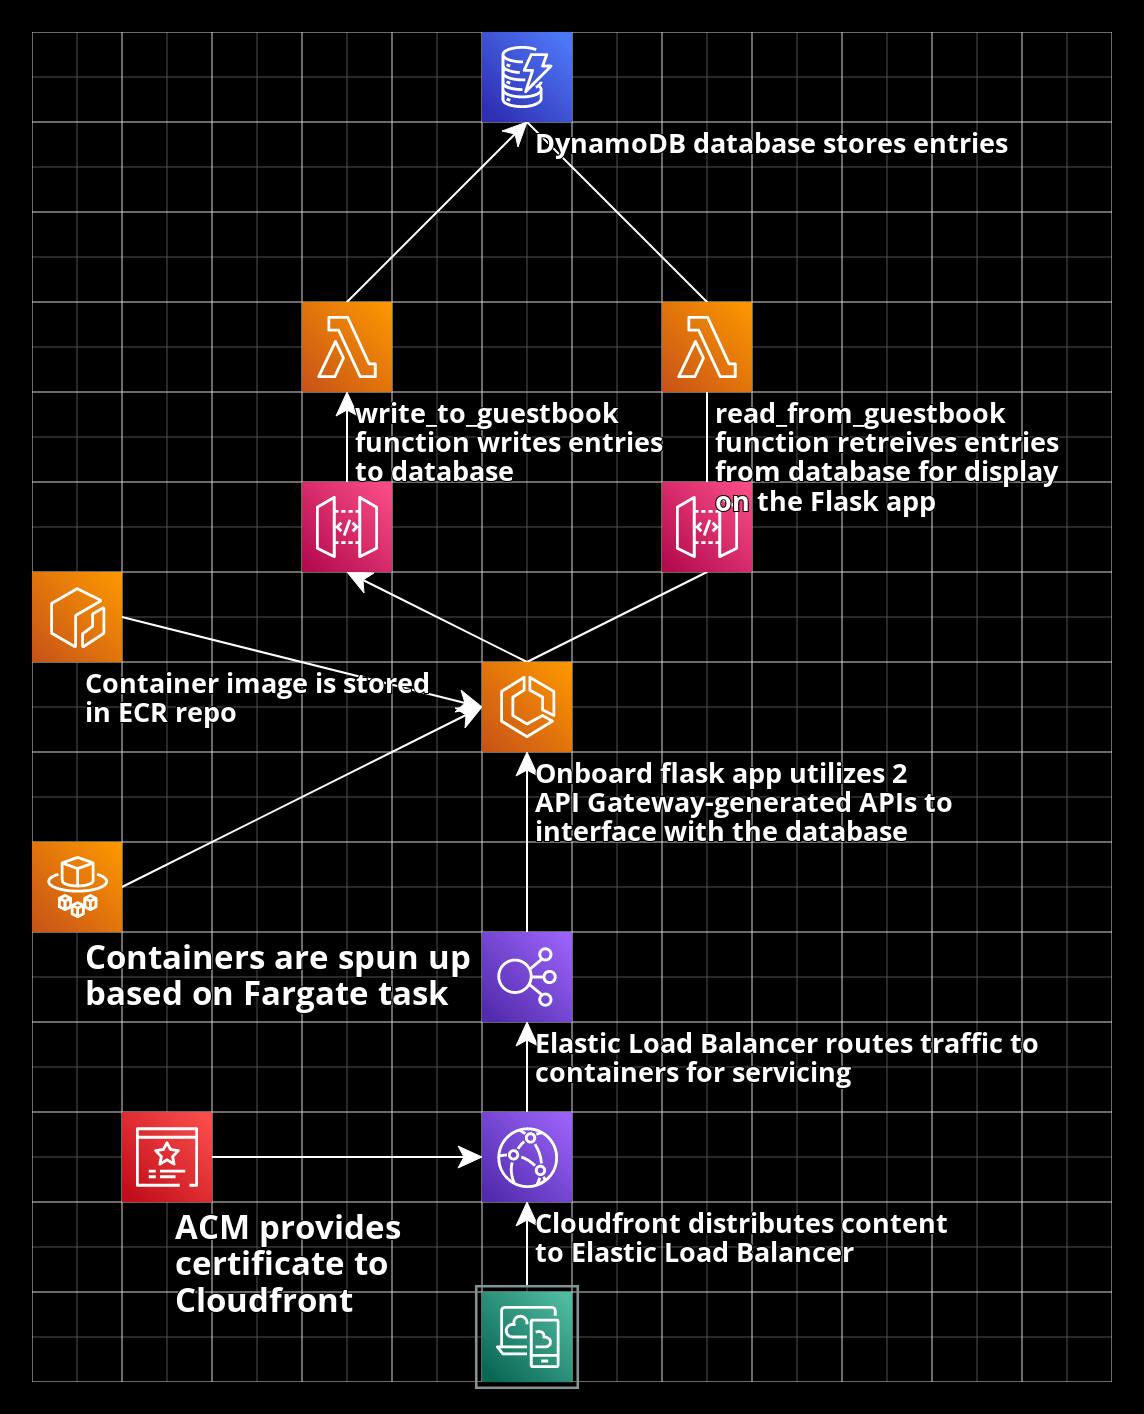
After taking a step back and re-evaluating, I had a rough sketch of what I was going to need to provision to make this project a reality. In addition to the desire to utilize ECS/Fargate and an ECR to host and service the containers, I knew a load balancer would be needed to facilitate routing traffic to containers that may be spun up or down at a moment's notice.
For a database solution to replace the SQLite database installed on the web server utilized previously, I opted to use a DynamoDB table which had the benefit of being both a serverless solution, as well as one that I have worked with in the past. I then utilized a pair of API Gateway-generated APIs to call a Lambda function to interact with the database (one to read, one to write).
With this rough plan in place, all that was left to provision the infrastructure via Terraform
Terraform
In addition to being one of the most established tools for the job in the industry at large, Terraform has established itself as the most trusted, most well-used hammer in my toolbelt for the proverbial nail of provisioning AWS infrastructure.
To help shore up one of my own perceived weaknesses of lacking experience interacting with and understanding code other people have written, I joined the current environment of enthusiasm regarding AI and invested in my future development by signing up for GitHub Copilot. While there is a slight learning curve in getting used to Copilot, both in the way you structure your code (insightful comments and small, concise functions are both somehow even more important) and how you parse suggestions from Copilot, I think it's an indispensable tool to speed up work, and allowing you to focus more on the fun things, namely architecture and the kind of tricky problems that every programming project presents, that any real programmer will point at as the most enjoyable part of their job (at least until they're dealing with the same error for 3 days straight). I mention this because GitHub Copilot is perfect for working with Terraform.

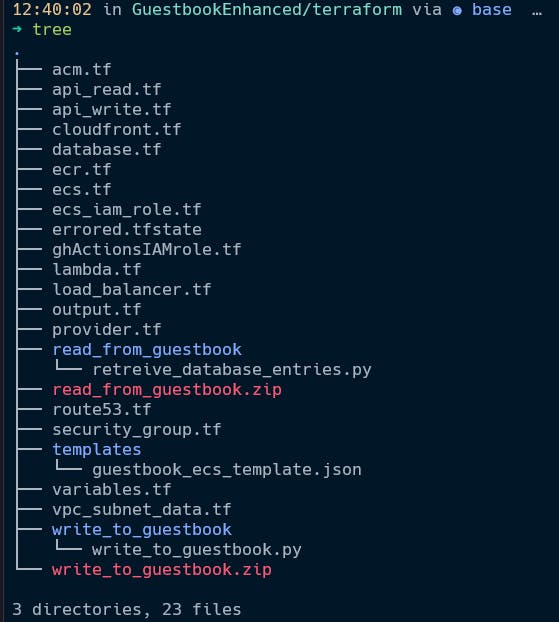
Even Terraform's staunchest defenders have to admit that provisioning architecture can get very repetitive, with a lot of boilerplate code denoting common configuration options. This is why, in my opinion, so much discourse within the terraform community is about taking scripts used to provision resources and converting them into reusable modules that will be used to provision similar elements in the future. Overall, I was very impressed with Terraform's ability to predict the settings needed to create elements, even referencing resources that I created with impressive accuracy, which is doubly impressive when the directory you're provisioning Terraform elements from looks like this:
ECS
Overall, the most interesting part of this project was setting up the pieces that directly interfaced with the container that hosts our Flask app, and the lifecycle works as follows:
First, the container image must be uploaded to an ECR repo. While it is technically possible to simultaneously provision the repo and upload the container via Terraform, it's very clunky and generally isn't recommended, especially since the building, tagging, and pushing the container is very quick and easy once the repo is created (if one was looking to push the image via a terraform apply command, my research indicates utilizing Hashicorp Packer to manage your machine images is typically recommended)
Once the container image is pushed, an ECS cluster will be responsible for actually deploying the containers. To do this, you will have to configure an ECS service with a task definition that will specify when and how these containers will be deployed. The container image is specified, as well as the compute resources that will be allocated to each container, and what ports the container is authorized to listen on.
Finally, an Elastic Load Balancer (ELB) will service internet traffic and route it to the containers as needed.
Overall, once I understood the ecosystem that ECS containers need to live on, the biggest issue I ran into was my containers would spin up, stick around for a couple of minutes, then fail their health check and spin down, only for a new container to spin up and repeat the cycle anew.
The health check was measuring whether the container and the load balancer could maintain a connection. The ultimate culprit was a mismatch between the port the container was open to receive traffic on (5000), and the port the load balancer listener group was configured to use to send traffic (I had erroneously set it to 80). Once, the listener group port was updated correctly, the load balancer and my containers were able to establish a connection, allowing containers to pass the health check, and allowing the ecosystem to reach a steady state.
Creating the CI/CD Pipeline to Automate Deployment
While I was able to manually push an image to the ECR, I knew being able to automate the process was a priority. And AWS agrees, which is why they have created a series of GitHub Actions modules that perform specific functions needed to complete this process. The rough overview of how this process works is as follows (the finished .yml manifest can be found here):
Connect to AWS (This requires a pre-configured OIDC role that will have the permissions GitHub Actions will use to make pre-configuration changes. there are 3rd party modules to do this via Terraform, but I ended up manually creating the role - I ran into a bunch of issues even getting it to run, and it was unclear what wasn't working correctly when it did.)
Log in to the Elastic Container Registry
Build, Tag, and Push the image to the ECR - this step utilizes the same set of commands that AWS recommends to manually push the image to the ECR repo
Download the currently existing ECS task definition - download the existing task definition for the ECS service as currently constituted
Render the new ECS task definition - this step takes the task definition downloaded in the previous step and updates it to reference the new container image
Deploy the ECS task definition - this step will update the task definition stored in ECS; this will cause the currently deployed containers to spin down (causing the website to go down) and cause new containers to spin up which will utilize the new container image
Invalidate the Cloudfront cache - without this step, changes made would take up to 24 hours to fully propagate, and would not propagate evenly, i.e. users located in certain parts of the world might be able to view the fully updated app after an hour, where users located elsewhere might have to wait the full 24 hours
Conclusion
Overall, this project gave me a lot of opportunities to learn more about containerization technology, and I think porting a project to a container-based infrastructure was an invaluable experience. This project may not have solved the issue of cost (ECS/Fargate is not a free-tier eligible service, and neither is the elastic load balancer) that initially inspired the project, but sometimes that's just how it is.
Moving forward, configuring the ELK (Elastisearch, Logstash, Kibana) stack to provide monitoring services is a good stretch goal for this infrastructure, and something I am interested in pursuing.
Until next time.